Wednesday 5 September 2018

Small project roundup


Having not managed to do much sewing myself over the summer, I have nevertheless managed to keep my students working on their various small projects and they have achieved a few finishes.  I thought it was time for a roundup of what they have made since the bunting bonanza (blogged here).

First up were some threadcatchers, made from stash fabric and scraps - see this excellent tutorial


Miriam made the two on the right and Sophie the one on the left.  We used Bosal In-R foam as the interlining so they are pretty sturdy and a good size: the girls mostly use theirs as baskets for fabric scraps and small blocks, whereas I use the one I made a while ago as a fabric wastepaper basket, for all my trimmings when cutting.  Having a nice tabletop receptacle has made me much tidier!

Next we tackled foundation piecing (free paper pattern here to download from Pieced by Number) to which we added a rainbow border of HSTs to enlarge the cushions to 16" square:


We also learned how to set in concealed zips (good tutorial here) which give a very professional finish, and added an external binding to finish the raw edges:


Sophie's cushion has the pink binding and Miriam's the blue.  They both did a great job, though the foundation piecing wasn't the easiest for beginners because of the funny angles involved.  The impact of the finished piece is great though, and they chose different quilting designs to personalise their cushions despite sharing the rainbow fabrics and background grey.

Next, and including a foundation pieced strip of flying geese, the girls made boxy pouches following a tutorial in this issue of Love Patchwork and Quilting [Sophie has my copy so the details of the tutorial will follow]:


Miriam made this one first to test the pattern, and then they each made the ones below (Sophie on the left following the rainbow theme and including a toning violet zip, and Miriam on the right with her favourite rich jewel colours picking out the colours in the main fabric):


Here are the other sides so you can see the colours used:


And here are the underneath/bottoms of the pouches - rather a shame that most of the time the bottoms won't be visible!   You will see that Miriam chose to modify the pattern so that her flying geese would all point towards the zip. whereas Sophie went for a continuous rainbow of colours.  It is great to be able to adjust a pattern to meet one's own aesthetic.


Lastly, we made bags: Miriam has made several bags before but this was Sophie's first.  They chose different patterns, both for blocks and for construction.  Miriam was making hers as a gift and went with flying geese again, pieced this time by the stitch and flip method and trimmed with the special Bloc_loc ruler to be precisely 1 1/2" x 3" finished.


From recollection, the bag finished at around 13" wide by 14" by 3" deep.  I am being a bit vague because Miriam worked out the design and layout of the blocks as she went along, based on how big overall she wanted the finished bag to be.  She came up with the idea to invert the central row of geese and to reverse the colour values.


We used waistband interfacing to make the straps both firm and accurate - much easier than fighting with scraps of wadding.


This bag was finished with a lining which turned inside out through a gap in the lining (the most common method) so the raw edges are all concealed.  Sophie's bag was made by a different method.


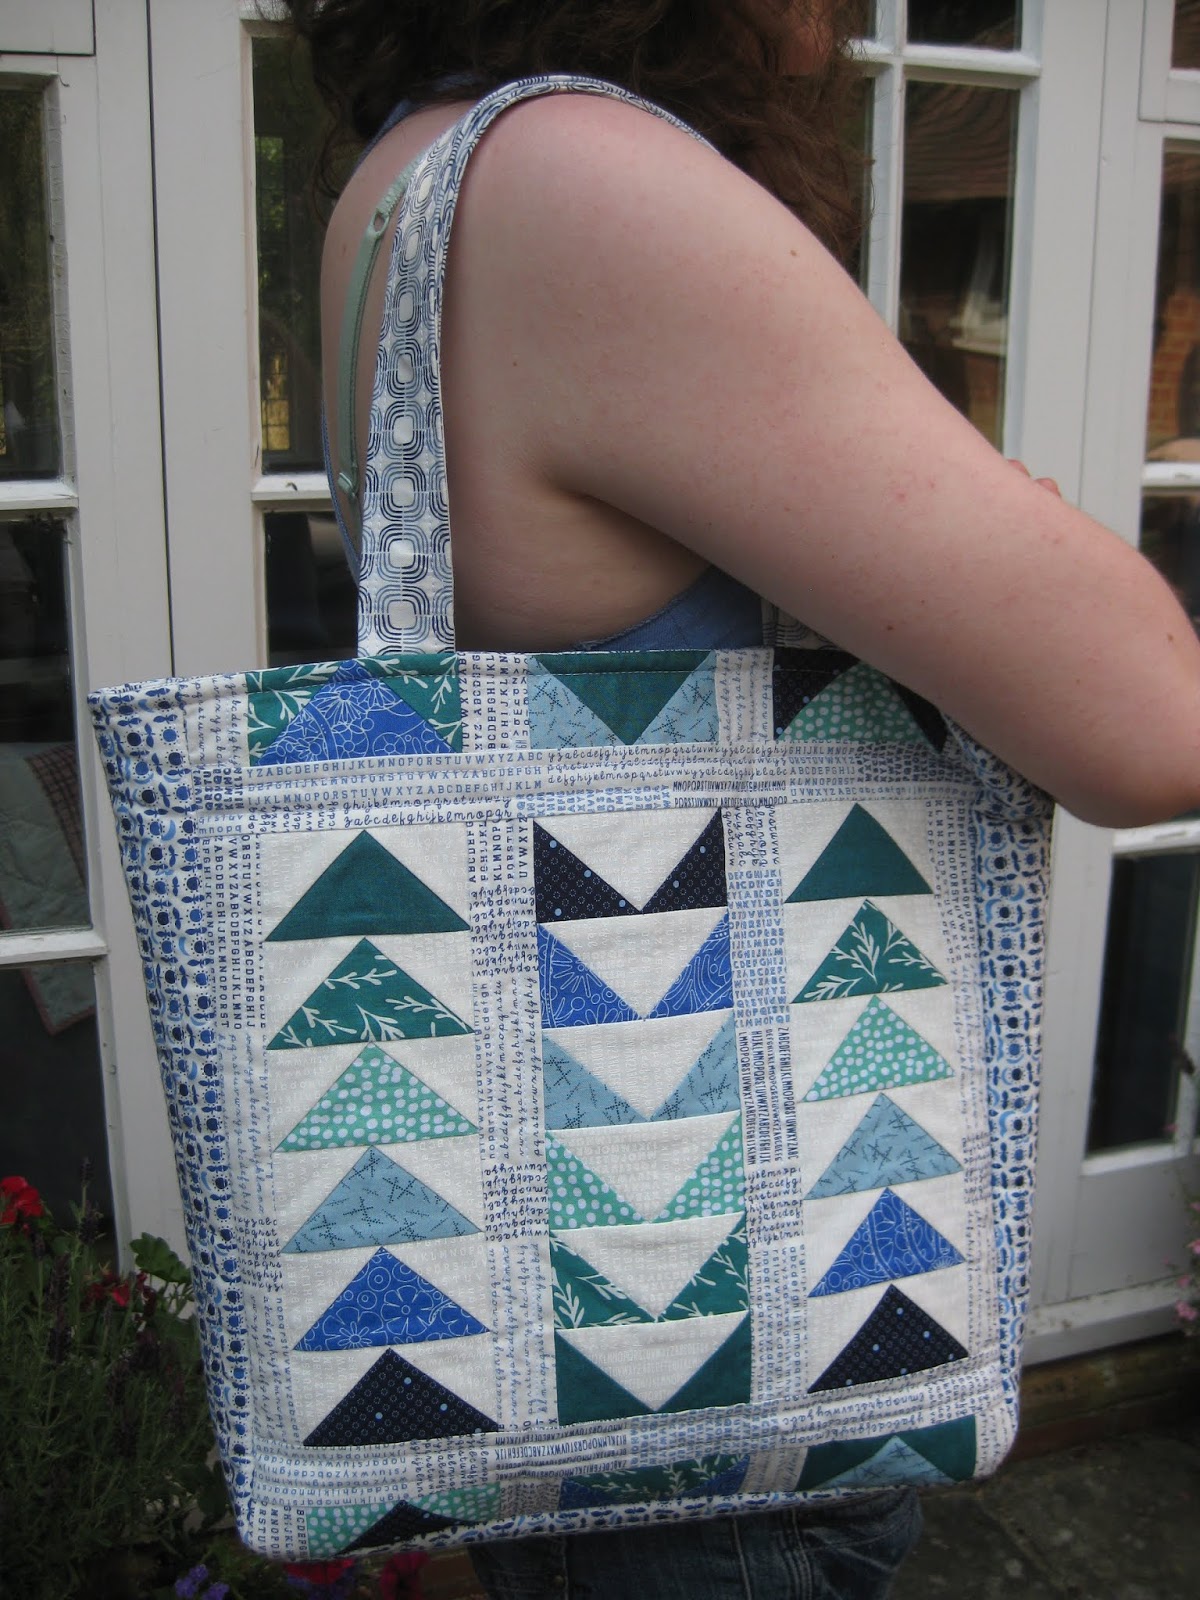
Here is Sophie's bag, made to hold her baskets of fabric to bring along to our sewing sessions.


We followed a tutorial from Moda Bakeshop called Clermont Farms Quilted Tote Bag by Glen Dragone, which I printed out many years ago (2010 is the date on the pattern!) and always intended to make but never quite got around to, so I was delighted when Sophie said she would give it a go. 

Here is the link: I've linked to the pdf/printer friendly version as the photos weren't loading on the link via Moda Bakeshop's website.


We wanted the bag to hold its shape and stand up well so it would accommodate two baskets full of fabric, so Sophie used a foam interlining rather than wadding offcuts.  It is not too stiff however and wasn't difficult to quilt.


The construction method for this bag involves quilting through the outer pieced section, interlining and lining, so the raw edges on the inside have to be bound.  The advantage is that the bound seams give extra strength and structure to the bag, but it is slightly fiddly to set in the base and manage the final binding where the panels intersect.  Sophie did a great job however and you will see how neat the inside corners are in this photo.


The finished bag measures 13" x 13" x 7" deep.  The squares and strips are cut from 2 1/2" wide strips so the bag is jelly roll friendly.

So that's been our summer.  I hope you will agree it has been a productive one for my students, if not for me.  I will have to pull my socks up to stay ahead of them this autumn!

Thursday 23 August 2018

Back in the (sewing) saddle again


[Not my quilt! - read on]

After an interlude far too long to dwell on, I am finally back sewing and blogging.  A variety of tasks and activities have kept me away from my machine, some pleasant, some less so, but it feels  good to have spent a few days at last with fabric, needle and thread and I wanted to share what I have been doing: HAND PIECING!!!

Yes, I know - you can't chain piece by hand, but months ago I had booked two workshops by Karen Styles of Somerset Patchwork which were held at Cowslip Workshops last week.  Having enjoyed Karen's classes last August (and despite having made no progress at all on the quilts I started then...) I signed up and arranged our family holiday in North Cornwall to fit the dates...


Here is the view from Cowslip across the valley to Launceston Castle.  As you can see, our glorious and uncharacteristically hot summer has ended (we were 75 days without rain in Surrey) and the weather was much more typical of a usual August.  I love this scene, whatever the weather, and we were happily sewing so who cares if the sun is shining...


We stayed in a remote 17th century National Trust cottage down a very steep track in the Valency Valley, near Boscastle.  It was so quiet and peaceful, no WiFi or mobile phone signal, perfect for recharging human batteries.  For literary fans, I walked the dog up the valley to St Juliot Church where Thomas Hardy met and courted his first wife, Emma Gifford.


The quilt at the top of this page, Robin's Nest, is the one I was particularly attracted to making as it seemed to me there was quite a lot I could machine piece.  I do like intricate traditional quilts but I have to be realistic about how much time I have (not a lot recently, alas) so my sewing machine is always the tool of choice.


Here are a couple of closeups of Karen's beautiful quilt to show some of the elements:


and here is what I managed to make in the course of the day:


It may not look like much but I was quite pleased as it isn't always easy to achieve a lot in a class situation where there is a lot going on (not just chat!) and new ideas to absorb. 

I machine pieced the small red stars (3" finished) and set them into a ring with 60 degree triangles.  I handpieced the triangles to the stars which didn't take long: Karen advised it is easier to manage the angles by hand, especially with relatively small pieces, and had lots of tips for handpiecing which made it really straightforward and accurate.

I have since made twelve small blue stars which I will piece into the outer ring with brown triangles and then set the two rings together.  I also cut lots of diamonds for the diamond border and the outermost six-pointed star border and I glue basted some of the leftover scraps on to half inch hexagon papers.  These are pretty small but so cute!


I hand pieced the stars: Karen showed us how to spin/fan the seam allowances for flat centres and how to stitch so as to ensure there are no little holes in the middle where the diamonds meet.


So I am starting to get some of the elements together; maybe it is not such a daunting prospect after all?  Watch this space...

But I am also hoping (what an optimist!) to work on another Karen Styles quilt: Circle of Sisters:


This was the second class I attended and it complemented the first day perfectly as we worked on hand piecing six-pointed stars which of course form the outer border of the Robin's Nest quilt.

Here are closeups of some of Karen's fabulous blocks which I think are about 16" across:


The quilt is based on an original which Karen owns, and there is plenty of scope to play with the placement of fabrics to create different effects. 

Here is what I managed to do on the day:


I really enjoyed the handpiecing and have done some more in the past couple of days.  The surprise is, when you are all set up and have done the preparation (which admittedly isn't the most exciting part), the actual sewing isn't all that slow.  However there are 1600 pieces in this quilt, so it may still take a while...

I am also be inspired to make some smaller six pointed stars as Karen's little ones are so delicious, and the occasional use of fussy cutting makes them even more adorable:


and to try the 365 tiny blocks in the Star a Day quilt:


Also on my 'one day' list is the fabulous Mrs Billings quilt which Karen has assured me I CAN machine piece (apart from the hexagons):


So here is the amazing lady who has made all these quilts, and whose excellent teaching, pattern writing and the provision of precise templates have made the designs accessible to and possible for the rest of us.  Thank you, Karen, for a terrific two days of classes.


I won't be changing the name of this blog any time soon but I will be making time for some handpiecing as well.   Enjoy your sewing this weekend!

Friday 23 March 2018

Bunting bonanza


Hello!  Here is a fabulous Friday finish from my students, Miriam and Sophie.  They have worked so hard over the past few months transforming a big bag of fabric squares which were no longer wanted and giving them new life as rainbow bunting.

The technique we used was the same as for my Vintage Bunting (tutorial in this post, there are a few unrelated quilt pics first so scroll down).


We worked out the best size for the pennants based on the amount of fabric available in each piece and the dimensions of the roll of Bondaweb (now called Vliesolinefix, I believe, but it will always be Bondaweb to me).  Even though the fabric pieces were free, I wanted to maximise the amount we were able to use.

The squares varied a little in size but most could be folded in half to give four double sided pennants, each measuring 7" across the base (top) of the triangle by 11" long.  We found that four pennants set 'head to tail' fitted perfectly across the folded fabric square and across the 18" width of a roll of Bondaweb.

(We made our pennant template from a sheet of A4 paper and just fiddled about until it fitted the fabric and looked a nice shape - you can make your pennant any shape or size you wish.  Once you are happy with it, though, it is worth making a plastic template as this is much more robust to draw round than paper or cardboard).

So decisions made, the girls set to work and we set up a production line for all the processes.  First task, to slice the roll of Bondaweb into 11" pieces (the roll is 18" wide) and for this we used a rotary cutter and ruler for speed and accuracy.

Then the fabric squares were pressed in half and the iron applied until the Bondaweb adhered to one half.  When the paper had cooled and the glue set, the backing paper was peeled off and the top half of the fabric square flipped down and pressed to stick.  Hey presto, a bonded double sided sheet of fabric, which could then be marked with the shape of the pennants and cut out.

We found that the easiest way to cut out the pennants was to mark the four triangle shapes on the fabric (arranged head to tail again) using the plastic template and either a pencil or chalk marker, and then to cut out with rotary cutter and ruler.  This meant we had really accurate sharp edges to our pennants.  I would not recommend you to use the template to cut against as it is not a safe method.


So each piece of fabric yielded four double sided pennants which then had to be zigzagged round the two long edges (not the base/top of the triangle as this will be covered by the tape).  I think this was the task the girls liked least, but they became very good at it, including navigating round the narrow tip!  I turned out my threads box to find colours which more or less matched the various shades across the rainbow.


Finally the preparation was done and the fun part could begin: Miriam and Sophie had glued, cut and stitched 288 pennants in total, four each of 72 different fabrics.  They were keen to use a rainbow layout so they first arranged the pennants in bundles of four in graduating colour order.


Next the question of how many pennants to put in each string?  After much deliberation and a bit of maths, it was decided to divide the pennants in to three different colour sets which would give 24 pennants per string, and there would be four strings of each colour set.


Once the decisions had been made, the pennants were sorted into their sets and the girls stitched them to the heading tape.  Finally the task was complete!  We didn't keep a note of how much time it took, and we have made other small projects in between, over the past three or four months, to keep from getting bored.  Definitely worth it, though, I hope you will agree.


So twelve strings in all, each one a rainbow but subtle differences known only to the makers.  Each string with 24 pennants measures about 4 1/2 metres in length.  We used a total of 20.3 metres of bondaweb and 56.4 metres of tape.  And we have about 54 metres of bunting in total - sufficient for most parties and the village fete!


All ready for the summer's events.  There's nothing like a string of bunting to make us feel like we're having fun.  And whilst this isn't exactly a free project (the Bondaweb and tape had to be purchased) the bunting is durable and should give many years of service.


Well done to the bunting makers: another skill to add to the CV.  Linking to Finish it up Friday at Crazy Mom Quilts.  Hope you have a happy and productive weekend, whatever you are working on.


Monday 19 March 2018

Thimbleberries Jewel Box II - a February finish


Too late for Finish it up Friday, my usual linkup, but I did have a finish in February which I thought I should show you now, before I get distracted by something else!

I mentioned that I was very good in January about focusing exclusively on quilting: this virtuous resolution carried over into February in that I layered several more tops in readiness, but I only actually managed to quilt one of them.  My excuse is that we had the plumber in, refurbishing our bathroom, which is a different sort of finish for which I cannot take credit.


Yes, it may look familiar to readers of this blog: I made another Jewel Box quilt from old Thimbleberries collections - probably 15-20 years old - and blogged about that one here.  Amazed to see it is almost exactly a year ago.  How serendipitous: I couldn't have told you if you had asked me when it was, so it's great to have this blog as a record.

As I said in the previous post, I had quite a few blocks left over, as one inevitably does, and once again I trawled through all my tucked away stash fabrics, chopping up anything which looked as though it might fit in with the country palette into 5" or 2 1/2" squares.  


This is a great scrapbuster quilt and there are lots of favourite old fabrics so for me it's something of a walk down memory lane.  It's also a great one for clearing out odds and ends of neutrals from other projects as variation in the neutrals adds interest.  As ever with a scrap quilt, the more different fabrics the better, as it is surprisingly hard to get a layout which doesn't repeat the same fabric in too close proximity.  Laying out the blocks satisfactorily always seems to take longer than actually stitching them together!


Don't you think the old patterns are sometimes the best?  Quilts like this one are really easy to live with; undemanding and comfortable, they just fit in with family life.  No-one minds if something gets spilled on them or they drag on the floor.  I guess that's why I keep coming back to this palette of colour and traditional blocks, even though I love the bright fabrics and modern aesthetic too.


At some point during 2017 I must have put the blocks together, and then had a pause till I found a suitable backing fabric in the Cowslip Workshops sale last summer.  I love this backing: it is from Moda's Collection for a Cause 'Nurture' line, and it has just the right country look.  Also the colour was perfect as it gives the quilt a warm and cosy  feeling.  So good to get the perfect fabric at a discount - who doesn't love a bargain without the need to compromise on artistic standards?!


I found enough of an old red Thimbleberries fabric (a useful favourite, also used in other quilts) for the binding.  Job done!  I do love shopping my stash and feeling thrifty: the fact that at some time I had to buy all of the fabric to be able to have a stash to shop is beside the point....


The quilting I did the same as for the first version: crosshatching through the diagonals and then a curving quatrefoil shape in the diamonds.  Easy to do with a walking foot and not too many ends to tie in, especially as this large quilt didn't need a border.


Quilt stats: 80" x 88".  One hundred and ten 8" blocks set 10 x 11.  The blocks are each made up of two 4" HSTs and two 4" four-patches (all measurements are for finished sizes).  I think I have now used up all my made blocks with this quilt, though the few fabric leftovers have gone into the makings of another scrappy quilt which still has some way to go...  Carry on quilting!